
I am working on a small quilt at the moment that I am hoping to be able to show you very soon. Occasionally, I have the need to appliqué text on a quilt or other project. I have put together a tutorial, as much for my own reference as anybody's, but perhaps you will find it useful. I am using Microsoft Word on a Mac, but the commands should be much the same for PC.
Open Microsoft Word. Go to File ... Page Setup. Change Orientation from portrait to landscape. Click OK.

Go to Table ... Insert ... Table. Set 'Number of columns' to '1' and 'Number of rows' to '1'. Click OK.

Go to Table ... Table Properties.
Click on the 'Row' tab. Choose 'Specify height' and set to your desired block height. In my case, I set this to 5". Also make sure 'Row height is' set to 'Exactly'.

Click on the 'Cell' tab. Set the 'Preferred width' to your desired block width. In my case, I set this to 7". Also set 'Vertical Alignment' to 'Center'. Click OK.

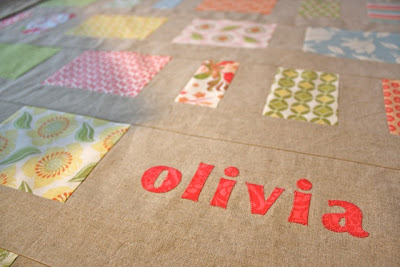
Type your desired text in the table. I typed 'Olivia'. Select your text and go to Format ... Font. Select the 'Outline' box.
Preview fonts until you find one that you like. Remember that if you intend to appliqué the text, it is best to choose a simple font with not too many corners to negotiate! I chose Optima Extrablack.
Increase the font size. Mine is 165pt. Click OK.
Note: You will need to repeat this step to fiddle with the font size until it fits your desired block size nicely.

Hopefully, on your Microsoft Word document, you will now have text that perfectly fits your block size. Print the document.

This template can now be used for tracing letters for appliqué. Place the template face down on a light box or window pane, and trace onto fusible web. The letters will be reversed. Cut out fusible web letters roughly, approximately 1/8" beyond the traced lines.
Fuse letters to the back of your desired appliqué fabric. Cut letters out exactly on the traced line with a short, sharp pair of scissors.
Use the template to position the letters on your quilt block. Press in place. I have appliquéd my text using a machine blanket stitch.


Can't wait to see a full picture of the quilt...from what I can see, it is just gorg!!!!
ReplyDeletecheers NIC
Thank you so much for sharing, this is great for cushions, bags, anything. Brilliant. The sneak peek is very nice.
ReplyDeleteYou are a genius! Just yesterday I was trying to make letters to applique - quite unsuccessfully, I might add. I can't wait to give this a try. Thank you so much! ~karen
ReplyDeleteFantastic! Thank you
ReplyDeleteWonderful Tips... thanks Dawn x
ReplyDeleteSUPER helpful....I will give this a try!!! Thanks so much cyber genius for helping those of us who just can' t figure stuff out without a helpful hand ( usually a husband...but they can get a bit grumpy giving computer lessons )!!!!
ReplyDeleteGreat tutorial! *clapping* : )
ReplyDeletevery good idea!
ReplyDeleteI'm making a quilt for an "Olivia" myself right now... yours is beautiful, by the way. :)
Thank you! I tried it out and it worked great. Your quilt is just darling.
ReplyDeleteGreat idea!
ReplyDeleteOlivia
Thank you for the EXCELLENT tutorial!!
ReplyDeleteThanks for the kind adice, will try this one day as I have often thought about it. Your work is really gorgous.
ReplyDeleteHi, this is a suggestion for climbing roses....I agree that Climbing Pinkie is a winner, I had one at my previous house, and I have just planted another at my new home. I have also planted Climbing Nahema at the suggestion of a friend, pale pink and a stunning perfume apparently. My favourite climber would have to be Pierre de Ronsard, pink in the centre fading to cream at the edges, a full-petalled rose like the David Austins, repeat flowering and not too vigourous, I love it!
ReplyDeleteExcellent! I never thought of using Tables! You are brilliant!
ReplyDeleteThank you so much for this tutorial!! My family and I came up with a "family flag" that had lots of words on it. I've been wondering how I would creat it - now I know!! Thanks!!
ReplyDeleteThank you, appreciate your taking the time to post this!
ReplyDeleteBlessings,
Shani
thanks for the perfect tutorial!!!
ReplyDeletexo
eva
Thank you for this wonderful tutorial. I used it on my latest quilt, just love it!
ReplyDeleteThanks for the tutorial - worked a treat!
ReplyDelete