 Cut a rectangle of medium weight fusible Pellon, approximately 20"x13" (I used Vilene H640). Choose coordinating fabrics, as many or few as you like, & cut strips 20" long. The width of the strips for my bag were cut 3.5" (stripe), 2.5" (blue), 1.25" (orange), 1" (yellow), 2" (green) and 4" (floral). There are lots of ideas for combinations on my previous post.
 Lay the base fabric, right side up, on the fusible side of the Pellon. Press. Be careful to press the fabric only, not the Pellon.
 Pin the second strip to the base strip, right sides together.
 Stitch a 0.25" seam. Use a walking foot if you have one, as this prevents the uppermost strip from stretching as you sew.
 Carefully press the second strip back against the Pellon. This is a sort of quilt-as-you-go technique, and means you don't have to quilt the top of the bag later. Continue adding strips in this manner until you get to the pom-pom trim.
 How to add a pompom trim with a header which needs to be hidden:
Pin the pom-pom trim to the top of the previous strip. Stitch the trim to the bag.
How to add a pompom trim with a header which needs to be hidden:
Pin the pom-pom trim to the top of the previous strip. Stitch the trim to the bag.
 Pin the final strip of fabric to the bag, with the pom-poms sandwiched beneath.
 Stitch the final strip to the bag, getting as close as you can to the pom-poms as your walking foot will allow. This stitching is awkward, and can be a bit rough. It is really only stay-stitching.
 Flip the entire bag over, and now stitch on or inside a previous stitching line, as close as you can to the pom-poms. A zipper foot at this point may help.
 Now press the final strip back against the Pellon & with a bit of luck, you will have a lovely row of pom-poms sticking out from the seam nicely!
  Add any extra trims you'd like at this stage by simply stitching them on the bag. Pom-pom trims with a decorative header can be added at this point rather than inserted in the seam as previously described.
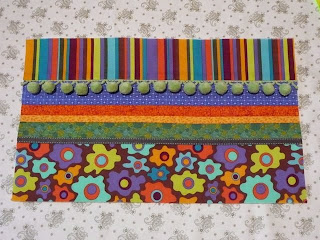
 When all strips have been sewn to the Pellon & all trims attached, cut the rectangle back to measure approximately 18"x11.5".
 You should now have something resembling the photo below:
 With right sides together, match the two 11.5" sides of the rectangle. Stitch this side seam and across the bottom of the bag with 0.25" seams. Fold the side of your bag against the centre bottom seam to form a triangle. Stitch across the corner approximately 0.75" from the tip. Repeat for the other corner. Trim excess from corners and turn bag right side out.
 Prepare two handles 15" long as described in this tutorial. Stitch them 1.25" either side of the centre top of the bag.
 Prepare the bag lining as for the outer bag, leaving a gap in one seam for turning. Keeping the outer bag right side out, place it inside the lining with right sides together. Matching side seam, pin the outer bag & lining together around the top & stitch with 0.25" seam.
 Turn the bag right side out through the opening in the lining.
  Top stitch around the bag top & slip stitch the opening in the lining closed.
 There ends the longest tutorial in history - I hope you've made it! I actually made my bag with pockets in the lining, but I think pockets will have to wait for another tutorial - it's late & believe me, I need my beauty sleep! Please ask questions if you don't understand my instructions.
If you are making this as a bible bag, it will fit a student's bible approximately 15cm wide x 22cm long x 4.5cm deep, with some extra room for pens, lip gloss, iPod, lollies, prayer notes (?) etc.
Hope to be back with a pocket tutorial soon. Happy weekend, Bloom.
EDIT: Pocket tutorial available here.


 Despite the champagne-induced bravado of my last post, I went to the shops on Saturday morning & bought some buttons for the bag! And I liked Satu's idea of adding handles.
 The choice of red and white for the bag was not actually in honour of the Sydney Swans (!), but more of an attempt to get a Scandinavian feel in honour of May Britt. A huge thankyou to her for her free pattern for this bag.


