Showing posts with label Tips and techniques. Show all posts

Thursday, 1 November 2012

Adventures of a paper-piecing novice

My heartfelt thanks to everyone for your thoughtful and supportive messages on my last post. Olivia continues in pure, unbroken, glorious good health and happiness. I am touched that so many of you sensed and shared my palpable relief and wonder that she is again well. I am still breathing in the peace and relief ... in enormous, deep gulps!


And so, this week I picked up needle and thread again, to revisit my Little Hexagon Purse. This is my first serious attempt at paper piecing, and I thought I'd pass on some things I've learned.


The finished hexies have 1/2" sides - I know, what was I thinking?! For the majority of fabrics, I trace around an acrylic template with a pencil and cut out the hexagon with scissors.


For fabrics pleading to be fussy cut, I made a 'window' template from light cardboard, and use this for tracing the shape onto the fabric.


I am using Sue Daley's method to temporarily glue the fabric hexagons to purchased hexagon papers. When I'm feeling diligent, I use a Sewline glue pen specifically developed for fabric. When I can't find the Sewline, I just use an ordinary old glue stick. Both achieve the same end.


After experimenting with various threads, silk and cotton of different weights and colours, I have settled with using this Aurifil 50 weight in a neutral beige (#2314). The colour blends sufficiently across the fabrics I'm using, and the thread is fine enough to sink nicely into the seams.


After stitching the hexies together, the papers are supposed to 'pop' out quickly and easily from the back of the work. I have obviously been too heavy-handed with the glue as there's no way my papers are 'popping' anywhere! I solved this dilemma by moistening the seams (on the back of the panel) using a small, soft paintbrush dipped in water. This diluted/softened the glue enough that I could quickly remove the papers. 


This purse is for my eldest daughter. It was supposed to be finished for a School Ball a week ago. Knowing full well that I was not going to get all those teeny tiny hexies pieced in time, I offered to make up a quick, 'one fabric only' substitute. 


This offer was duly accepted by said 17-year-old on the proviso that the 'real' hexie purse be completed by Christmas :) Deal!

Monday, 31 October 2011

Fabric storage regime #173,905

A regime of a different sort for this post. I have embarked on a new storage system for the larger cuts in my stash. This was necessitated by a frustrating search of my fabric mountain for a piece sufficiently large to back my most recent quilt.
The system? I intend to fold any cuts larger than one metre, to stack them immaculately, and label with ducky little tags detailing the meterage. I will then be able see, at a glance, what I have. Easy peasy!
That's the plan. Could take some time to accomplish. No appreciable dent in the mountain as yet :)

Monday, 7 March 2011

Distracted by colour

My apologies for a quiet blog for the last little while. Life has been busy with kids' swimming carnivals, a school fete, some work days here and there, and trips to the farm. There has regretfully been no sewing time, but mercifully, some thinking time!

I have been thinking about colour. It all started here, with this Anna Maria Horner 'Good Folks' print purchased recently. I noticed an astonishing FIFTEEN colour dots on the selvedge. Correct me if I'm wrong, but I think this means fifteen different screens for a single print - wow! No wonder this fabric packs a punch!
I love to use the colours of selvedge dots to inspire colour schemes for quilting or stitchery designs.
Another source of colour inspiration is Color Collective. Lauren Willhite has compiled this wonderful resource by using the works of artists, designers and photographers to inspire imaginative, often unusual but always beautiful palettes of colour. Any day that you are stuck for a new colour combination, you are bound to find something to enliven your senses at this site.
You can waste a whole lot of time over at Kuler, where there are endless colour schemes to fire your imagination. Under the 'create' tab, you can upload your own photographs and Kuler will generate colour palettes to match. You can even choose a 'mood' for your palette from colourful, bright, muted, deep or dark.

For colour advice, specific to quilters, there are some great posts written by bloggers to refer to. My first port of call would be the queen of colour herself, Rita at Red Pepper Quilts. Rita has written a wonderful post called Colour in quilting in which she advises to take time to notice colour in the everyday.
Jeni, at In Color Order, is writing a brilliant series of posts called The Art of Choosing which deals with fabric and colour. She has lots of great advice about choosing and organising fabric, based around principles of colour. Pop over to Jeni's and feast your eyes!
And just for fun, here's what happens when colour, a bookshelf and someone with a whole lot of time collide!

Imagine doing this with your fabric stash - how fun! Have a great week,
Bloom x

Friday, 11 February 2011

Tip of the day

Not that my days are chock-a-block with tips, but here is my 'tip of the day' nonetheless. Inspired by this post, over at La Vie en Rosie, I made myself a block board today. 
Armed with a $2 art canvas, some spray adhesive and some fleece, I made myself a block board. That is, I stuck the fleece to the board and trimmed the excess. How clever am I?! I chose the art canvas only because it is flat and inflexible. Any sort of 'board' would do. 
I can now transfer my nine-patch pieces from my design wall to my machine (admittedly only metres away!) without losing bits or forgetting the layout I decided upon. The fabric squares stick nicely to the fleece, no slipping. What can I say - happiness from the simplest things!

Sunday, 5 September 2010

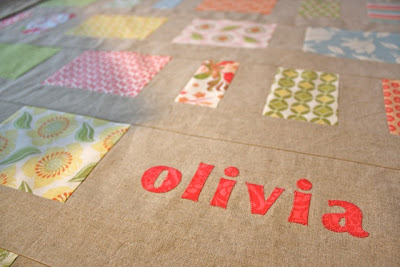
Tutorial - Fitting appliquéd text to a quilt block

I am working on a small quilt at the moment that I am hoping to be able to show you very soon. Occasionally, I have the need to appliqué text on a quilt or other project. I have put together a tutorial, as much for my own reference as anybody's, but perhaps you will find it useful. I am using Microsoft Word on a Mac, but the commands should be much the same for PC.


Open Microsoft Word. Go to File ... Page Setup. Change Orientation from portrait to landscape. Click OK.


Go to Table ... Insert ... Table. Set 'Number of columns' to '1' and 'Number of rows' to '1'. Click OK.


Go to Table ... Table Properties. 

Click on the 'Row' tab. Choose 'Specify height' and set to your desired block height. In my case, I set this to 5". Also make sure 'Row height is' set to 'Exactly'.


Click on the 'Cell' tab. Set the 'Preferred width' to your desired block width. In my case, I set this to 7". Also set 'Vertical Alignment' to 'Center'. Click OK.


Type your desired text in the table. I typed 'Olivia'. Select your text and go to Format ... Font. Select the 'Outline' box.

Preview fonts until you find one that you like. Remember that if you intend to appliqué the text, it is best to choose a simple font with not too many corners to negotiate! I chose Optima Extrablack.

Increase the font size. Mine is 165pt. Click OK.

Note: You will need to repeat this step to fiddle with the font size until it fits your desired block size nicely.


Hopefully, on your Microsoft Word document, you will now have text that perfectly fits your block size. Print the document. 


This template can now be used for tracing letters for appliqué. Place the template face down on a light box or window pane, and trace onto fusible web. The letters will be reversed. Cut out fusible web letters roughly, approximately 1/8" beyond the traced lines.

Fuse letters to the back of your desired appliqué fabric. Cut letters out exactly on the traced line with a short, sharp pair of scissors.

Use the template to position the letters on your quilt block. Press in place. I have appliquéd my text using a machine blanket stitch.


You can now add whatever text you like to your latest creation! 

Monday, 5 April 2010

New storage

My latest hair-brained idea in my never-ending quest to organise my stitching projects is this set of tins.
I had the good fortune to find these biscuits at my local supermarket in the post Christmas sales. They were filled with the most divine chocolate biscuits, but it was the tin that really took my eye. I love the embossed filigree-style pattern on the lid. I bought as many tins as remained on the shelf!
It took us a whole term of school lunches to eat our way through the biscuits (!), but at last they are ready for housing my projects. I have stuck strips of scrap booking paper to the outside of the tins with double-sided tape.
And the lid has a ducky little indent, just perfect for adding labels so that I know which tin contains what! I do love them. Not sure if it will help me get projects finished any more quickly, but at least they look good. And surely looking good is half the battle ... isn't it?!

Thursday, 26 November 2009

How to cut Dresden plate wedges from 5" charm squares

Thank you for your interest in my tutorial for cutting wedges from 5 inch charm squares. The tutorial has moved and is available in its entirety at this link. Best wishes, Bloom.


Wednesday, 3 September 2008

Easy-peasy bag pockets

I usually use this method to do pockets inside my bags. It is easy and quick! Prepare lining fabric for your bag. For the 'Blossie Bag' in this tutorial, I cut my lining 9.5" x 21.75". Cut a pocket panel from a contrasting fabric, 8.5" by the width of the lining.


Cut a rectangle of medium-weight fusible pellon, 4" by the width of the lining. Press the pocket panel in half. Place the Pellon on one half of the pocket panel.


Fold the pocket panel over the Pellon & press into place.


Pin the pocket 6.5" from the top of the lining, raw edges towards the top.


Stitch the pocket to the lining using 0.25" seam.


Flip the pocket panel up towards the top of the lining & pin in place.


Topstitch the pocket 0.25" from the bottom.


Stitch the sides of the pocket to the lining, just to keep it in place.


Stitch a series of vertical lines on the pocket panel at desired widths, to fit pens, mobile, iPod etc.


Fit lining to the outer bag & complete as described in the previous tutorial. The inside will look a bit like this:


Hope this makes sense. Again, please email me with any questions.

Thursday, 22 May 2008

The latest in birthday party entertainment ...

Stuck for an idea on how to entertain a party of 12 year old girls? Mine went to a party recently to find a table beautifully set out with tiny rolling pins, piping bags, cute cutter shapes, ready-to-roll icing in the sweetest of colours, & bare little cupcakes, ready to be transformed. Here is the result:The girls had the most wonderful time decorating their little cakes, and were even let loose on the big birthday cake, rolling lots of little roses and sticking them on top to create a gloriously girly cake for the birthday chick. I thought this was an ingenious idea, & is evidently popular for 'big girl' parties too, especially hens nights! Play dough for grown-ups really!

Tuesday, 26 February 2008

Call me a perfectionist ...

During my first conversation with a new acquaintance recently, my precious 12 year old daughter innocently volunteered the information that I am a perfectionist. The woman we were talking to suggested to my daughter that perhaps she didn't need to divulge her mother's bad habits so soon! Well, I have to say that I actually don't consider my perfectionist tendencies a bad habit. They make my life much more complicated than it needs to be, but it is how I have been made. As proof that I am comfortable with my perfectionist nature, I will share the following! For as long as I have been quilting, I have aspired to a perfect quarter inch seam. My seams have consistently been a smidgen too deep, which for most patterns isn't a problem. But I am really keen to master a perfect seam allowance before I attempt the scariest quilt on my 'to do' list - Miss Rosie's 'Summer Wind': As you may be able to see from the picture, the smallest seam error will simply compound as rows are added consecutively to the central block of this pattern. In my quest for accuracy, I came across this wonderful post and this one, which detail how to perfect a seam width which will give accurate block sizes every time. In summary, I build a temporary barrier from a wad of Post-it notes and tape it to my machine at a position which gives me a 'scant' 1/4 inch seam. As I sew a seam, the fabric butts up against the barrier as you can see in the photo, and prevents me from sewing too deeply. The little notch cut out of the Post-it notes accommodates the feed dogs below. If you are totally confused as to what I am on about, read the links I have listed. This technique has really worked for me. I have been teased about my perfectionism so many times, it no longer offends. So feel free to tease away! But call me 'anal' and that's quite another story!

Saturday, 1 December 2007

My very inelegant, kind of weird, but totally effective way to turn a handle

This is how I turn an inside-out tube of fabric in the right way. It is one of those tutorials that you may not understand until you try it. Master this and you can turn a handle in 30 seconds flat!

Prepare your bag handle tube. Mine has been prepared using my favourite method detailed in a previous post.


The crucial equipment required for this method is (wait for it!) a piece of poly pipe usually used for garden irrigation and a length of wooden dowel. My pipe is 13mm in diameter, the dowel is smaller at 10mm diameter. Both are approximately 50cm long. It is helpful if the dowel is at least 10mm longer than the pipe.


Using a large stitch length, sew across one end of your handle, using 1/8" seam allowance. This is a temporary basting stitch and will be removed later.

Slide the irrigation pipe into the handle until it butts firmly against the end of the handle you have just stitched closed.

Now this next bit is tricky to explain. Working from the closed end of the handle, use the dowel to push against the irrigation pipe. The handle fabric should begin to roll back down over the dowel.

Work the fabric down over the dowel until the handle is the 'right side out'. This process honestly takes less than 30 seconds.

You should end up with your handle right side out with the dowel inside it. Remove the dowel. Either unpick the temporary stitching on the end of the handle, or simply cut the temporary stitching away.

To press the handle, I again use the irrigation pipe! Insert the pipe into the handle. Carefully press the handle with the pipe in it. The pipe helps to open the seam nicely for pressing. 


This technique works perfectly for the handles I posted about earlier (approximately 1.25" wide, finished). If your handles are wider, you may need to use larger diameter pipe and dowel. The crucial thing is that the dowel has a smaller diameter than the pipe. The dowel should actually fit inside the pipe. Please don't hesitate to ask me questions if all this makes no sense to you!
Related Posts Plugin for WordPress, Blogger...
Blogging tips